Our family is growing in many ways... Growing in numbers, knowledge, parenting skills, growing in love, in our faith, growing our culinary skills (if you can call it that), growing without gluten (some of us), growing green...........
Showing posts with label recipes. Show all posts

Thursday, January 19, 2012

Green Cleaning: Furniture Polish

I've never really liked dusting. I've actually always kind of hated it, especially when there is so little dust you can't even tell. I like for things to be dirty if I have to clean them! I like to be able to see a difference so I know there was a good reason to put that effort into it. BUT dusting is a must in this house with a couple of us having some pretty strong allergies to dust (or dust mites, to be specific, but it sounds kind of gross when you add in the mites part...). I also hate using cleaners that are full of toxic ingredients that could harm my child (or myself). So, I make our furniture polish. It's very easy, as most green cleaners are, and works super well. I actually have two recipes, since you'll need different ingredients based on the type of furniture. And actually, they both have the same ingredients, just varying amounts. Let's get to it...and then get to cleaning!

There are four ingredients. Three are shown here, with a bottle of one of the cleaners mixed up. Water (purified is best), vinegar, olive oil, and pure essential lemon oil. That's it! You probably have most of these on hand already. Don't have the lemon oil (use the real stuff, not just lemon scented somethingorother)...you can use vanilla. Or leave it out. It's not a necessary ingredient.

Furniture Polish - This is good for general, weekly polishing, especially with finished woods.

In 16oz bottle, add:
2 tsp olive oil
20 drops or more pure essential lemon oil
1/4 cup white distilled vinegar

Fill the rest of the bottle with purified water. 
Shake well before each use, as the oil and vinegar will separate. 
Spray directly on a rag or on the furniture.


Wood Furniture Polish - This is good for unfinished or lightly finished woods. 

In a small squirt bottle (not a spray bottle), add:
3/4 cup oilive oil
1/4 cup white distilled vinegar,
50 drops or 1/4 tsp pure essential lemon oil (or pure vanilla extract)

Shake before each use. 
Pour onto rag and then apply to wood.

There you have it! Very easy. And these polishes are great! I've already converted a couple friends (some who were quite fond of their other furniture polish and weren't sure they would like this - but they loved it!). Hopefully this will convince a few more folks out there to try it, as well! ;)

And for a little fun... I'll throw in a picture of me getting ready to clean the cabin we visited last fall. Aiden got super sick as soon as we arrived (even with the allergy medicine we brought along), due to the dust hiding under the beds, behind furniture, along baseboards, on things like this...
These kinds of things are really cute, yeah. But the first thing that crosses my mind when I see them? Dust! Big-time dust collectors. This is why you will not find these things in our house. Cute. But not good for folks with dust (mite) allergies. You can't clean these things!

And here I am. Pretty, huh? I'm ready to go in fighting and tackle that dust! Since I have the same allergies, I have to wear a mask when cleaning. Even with the mask this time, I still could feel it affecting my nose and sinuses for the rest of the day. Thankfully I took along my neti pot, which helped clean it out some. And the mask helped a lot, regardless. Plus, it's a great fashion statement, no? ;) We didn't use all the ingredients for the spray above, since we were in the middle of nowhere (we drove an hour one-way just to get the vinegar and swiffer!), so I just used a bucket and dumped in water and vinegar. Great ingredients when you're lacking anything else!


That child of mine woke hourly the first two nights, crying because he couldn't stop coughing and sneezing. After I cleaned, he slept all night long without waking once. That's how I get paid for my job. Definitely worth it.

Sunday, December 4, 2011

CranApple Smoothie

It's the season for cranberries, apples, and...well, it's always the season for smoothies around here! And they all go together wonderfully, of course! The kids really like this one, and we never have leftovers, even when making a large amount.


I know not everyone is a big fan of cranberries, especially raw cranberries. They're quite tart. Add all the sugar it might take you to like them, and you've kind of taken out some of the health factor there! Cranberries are so good for you! They contain fiber, vitamin C, phytonutrients (that may help fight several types of cancer) and are a great source of antioxidants. Something interesting about cranberries, from 101 Foods That Could Save Your Life...cranberries have antiadhesion properties. These properties help prevent certain bacteria from sticking to cells in our bodies; this is how consuming cranberries helps with fighting UTIs, as well as other things. Make you want to go out and eat some? With this smoothie, you probably won't even need a sweetener, as the apples, bananas, and blueberries add plenty of natural sweetness. If you do, though, a little squirt of agave or honey should do the trick.

Try it out and see what you think!

Saturday, December 3, 2011

(Healthy) Hot Chocolate!

It's that time of year again... It's getting colder outside. Christmas is in the air. The kids go playing outside and then come in freezing (well, not quite freezing here just yet, but we've had some fairly cold days!) and want something warm to drink. Something like hot chocolate, of course!


If you love hot chocolate but maybe don't love all the sugar that goes into it, then read on! If you're happy with your sugar-laden hot cocoa, I still encourage you to try this because it tastes just as good, if not better. No kidding! Hot chocolate does not need to be unhealthy, and this way..it's not!

Monday, October 31, 2011

Snack time! Apple Nachos

I saw something about apple nachos on pinterest recently,and it caught my attention. I'm glad I clicked to learn more because I first thought it looked like they were drizzled with caramel. Sure, that might be yummy (though I'm not a big caramel fan, myself), but it's not the healthiest thing ever. I almost passed right over the pin and moved on. But then I realized, nope..it was peanut butter. The whole snack was pretty darn healthy. And I knew I had to try them. But I had to tweak them to make them allergy-friendly for our home. The hubby has some tree nut allergies and is also allergic to peanuts, so out went the peanut butter and sliced almonds. Apples are in season big-time in North Carolina right now, so we've been buying a half of a bushel at a time from the Farmer's Market and eating lots of apples. So, a new way to eat them for a snack really appealed to me. Not that we tire of just plain apples. We can, and do, eat them every day! But new is nice sometimes.

So, this is our version (based on this one). Hope you try it and like it! You can easily change things up and make it your own. Feel free to share how you make it, too!

Apple Nachos
2-3 apples, depending on size, sliced thin (thin enough for little kids to easily eat after toppings are on them, not super thin)
3-4 Tbsp Sunflower Butter
Small handful of chopped pecans
Small handful of chopped walnuts
Small handful of dark chocolate chips and/or raisins
Unsweetened shredded coconut

Slice the apples and place them around a big plate, overlapping some, if needed. If you want, you can spritz them with some lemon juice to keep them from turning, but we didn't do this.

Melt the sunbutter until thin enough to drizzle over the apple slices.

Side note: I first tried this on the stove. Even though I used low heat, it still did not work and resulted in sunbutter that had to be tossed. Maybe this works fine with regular peanut butter, but it didn't work for me with the sunbutter. I could have attempted using the microwave to melt it, but I was left with just enough for the snack at this point and didn't want to chance ruining it all. So, I used the double boiler method, just as if you were melting chocolate. That worked well enough! It did take a few minutes, but it was very worth it in the end! (Updated to add...tried the microwave. That didn't work, either. So far, double boiler is the best way I've found to thin the sunbutter.)

Once sunbutter (or whatever nut butter you choose) is melted and thin enough, drizzle over the apple slices. I just took the whisk and did a little at a time. It didn't drizzle perfectly, but it worked well enough! Leave a little bit of the sunbutter for the very top layer.

Sprinkle on pecans, walnuts, chocolate/raisins, and coconut. Drizzle remaining sunbutter on top of everything. Serve!


We used dark chocolate chips on one half and raisins on the other half. I actually (surprisingly) preferred the raisins! Aiden didn't seem to care which he got. So, I'll probably stick to raisins next time. Camden, the 12-yr-old, wasn't thrilled with the snack but kept coming back for more here and there. He isn't a huge fan of sunbutter, but he liked the rest. I didn't love sunbutter when we first started using it, but I've gotten so used to it now, I kind of prefer it to peanut butter. If you've never tried it, it's a great nut-free alternative.


Raisins side...

Dark chocolate chips side

We ate this while having some family time with a redbox movie (Rio - very cute!). The snack did not last long, even though I made a huge plate full of it! One other thing I loved was that it is not nearly as messy as it looks! Everything really sticks to the nut butter pretty well! It was a big hit, and we will definitely be serving this up again.

YUM!

Friday, October 21, 2011

Easiest Meal Ever? Close, at least! *Salsa Chicken*

If you're looking for a super easy slow-cooker meal that is healthy, delicious, kid-friendly, inexpensive...this is a great one! This has quickly become one of our favorite meals. I got the original recipe from my friend, Leigh Ann, and have adjusted a little based on how I usually cook. You can use canned items, but we try to avoid them when we can and use either fresh or frozen in place of them. We cook dried beans and freeze in jars that would give us a can's worth at a time. We do use a jarred salsa, but you can use whatever you like. It's one thing I haven't tried making myself yet. ;)

This is supposed to be called Salsa Chicken, but after I somehow kept getting the words reversed and got tired of my 12-year-old correcting me, I decided it would be called Chicken Salsa in our home. I don't know why I never get it right, so we just made the backwards way right. Now I can correct that kid when he says it "wrong," right? Right. I'll use the "correct" name for you, though. We've also made this with turkey leftover from Thanksgiving before. Came out just as yummy!

Salsa Chicken

Only five ingredients!

Monday, October 3, 2011

Overnight Steel-Cut Oats

I know a lot of folks out there like oatmeal. I am not one of them. For me, it's totally a texture issue. I like other things with oats in them, but oatmeal not-so-much. That is...until I started eating steel-cut oats. What a difference! The taste is still there, but they're a bit chewier and nuttier than rolled oats. It's not the same as the other mushy oatmeal that I don't like. I still can't eat it every single day, but I do like to have it on occasion, especially when it gets colder outside and we all want a nice warm breakfast in the morning. And the boys really like it!


The only thing is, steel cut oats can take a while. Half an hour or so. I know I certainly don't have that kind of cooking time in the morning! For a while I would just cook it at night and then put it in the fridge to reheat in the morning, but then I learned about making *overnight* steel-cut oats. It's the best of both worlds...you get the good kind of oatmeal (in my opinion) and it doesn't take forever to make. Plus...steel-cut oats are actually better for you than regular oats. They are much less processed and have more dietary fiber. (And if you eat gluten-free, you can just use gluten-free oats.)

This recipe makes quite a bit, which we happen to like because we can all eat it for breakfast one weekend morning and then use leftovers for some of us for breakfast during the week. You can easily halve it or change the amounts to make the amount you want.

Friday, September 16, 2011

Pumpkin Pie Yogurt

I just posted on how we make our own homemade yogurt, and since it's almost fall, we've been making some "Pumpkin Pie" Yogurt that the boys are in love with... I made some for my 12-year-old the other morning at breakfast. He literally licked the bowl clean. Then, the second he got home from school, he asked me to make more for his snack. And I caught him using his fingers to get every single last bit out of that bowl, too! The other day at lunchtime, I gave some to the little girl I watch, and I even saw her eat it all and then bring the bowl to her mouth to try to pour any that was left into her mouth. So, yeah, it's a bit of a hit over here...

I tried to measure everything the other day so I could actually say how much I used because I was just dumping stuff in before that. This is great with regular yogurt, but it's even better with greek yogurt because it's a bit thicker, especially with the added ingredients. If you want to try it, here it is...


Homemade Yogurt

I've been making our yogurt for a while now. I started mostly because I didn't want to buy sugar-filled yogurt when Aiden was starting to eat it as a baby. We got a yogurt maker and were set. The yogurt was good, easy, we knew what was in it, and we flavored it ourselves. I had heard about making yogurt without a yogurt maker, and not too long ago, I finally tried it. I was kind of getting tired of using those little jars to make yogurt, for one thing. And it took up space on the counter, which is already so small. Anyway, after looking up some recipes online, I went for it. And it worked! I've tried several ways, many of which work just fine. If you want to make yogurt at home, I recommend it. It's really very easy; you'll just have to find which method works best for you!

Why make your own yogurt? Any flavored yogurt out there will also be loaded with sweeteners, for one thing - and way more than you need (and probably way more than you want, once you really take the time to look at the label). There are usually preservatives and other things that are unnecessary. Even organic yogurt (and especially those yogurts made for babies and kids!) will have stuff in there that you probably don't want. Plus, organic yogurt is expensive - making your own organic yogurt is a lot less costly. Yogurt you make requires only a couple ingredients. Milk and some kind of starter. Yes, that's it. We do buy freeze-dried yogurt starter for some batches. I'll make yogurt with that, and then the next round or two is made with leftover yogurt that hasn't been flavored. Below I'll show you how I make yogurt for my family. The recipe I use is based on a post from Passionate Homemaking (great blog - check it out!).

So, here's how to do it all...

Monday, August 29, 2011

Cold-Brewing Coffee

Again, I have a new way of making coffee... (If you remember, I recently cut out sugar and posted about going through that. Yay!) I had heard about cold-brewing a couple times, especially through reuseit.com, since they sell stuff for that and promote it. But I hadn't seriously thought about trying it out. Then a friend posted Pioneer Woman's way of making cold coffee. Again, still didn't think about it seriously.

And then Aiden's birthday came around again. (Yes, another post I haven't gotten to, yet... August is a busy, busy month.) Whenever we have a crowd over, we serve a cold coffee drink that is always a big hit. But we don't have a coffee pot. We only have a filter-thingee that makes one cup. One. Last year, we borrowed a pot from a neighbor to make enough coffee for the party, but I once was told, "If you have to borrow it twice, you should buy it." So, I didn't want to do that again. But we also didn't want to buy a coffee pot to use just a couple times a year.

Then I remembered the post on cold-brewing. I actually read it, realized how easy it was, and went for it.

And it was more than easy. I will be doing this from now on.

Friday, August 12, 2011

Strawberry Soup!

There are so many reasons I love making strawberry soup. For one, the boys both *love* it. It's super healthy. It's super easy with just a few ingredients and a blender. It's the perfect thing to make for lunch when it's suddenly lunchtime and you realize...whoops, nothing is planned and everyone is hungry NOW. That's the kind of meal I love.

I found this recipe in a magazine... You never know how those kind of recipes will turn out, especially when you're the kind of person who loves things that come with lots of reviews (I would be that kind of person). You don't get reviews when you make something from a magazine. BUT this did not disappoint! And I found a way to make it even better - spinach! (Yes, really. Get excited!) So, here's the recipe with at least one review (mine), if that counts for much. ;)

Monday, August 8, 2011

Green Smoothie Base and Blender Cleaning Tip

Such a beautiful green smoothie!
I put up a post on green smoothies last week - why they're good for you, a few recipes, some links, etc. I aim to continue to post other recipes as we make them (those that are good, at least!). I'll have a "green smoothie" label so you can find all posts related to them via that label.

Today we had one of our favorite smoothies. I posted about this on my new facebook page last week (if you haven't already "liked" it, what are you waiting for? wink, wink!) and got a few good responses. It's a really good recipe for beginners because it is mild, sweet-but-not-too-sweet, and you really can't tell there are any greens in it. It's a great base to start with and add to as you figure out what you like. Some neighbors stopped by earlier today when I happened to be making smoothies for snack time. The little girl, who isn't a berry fan, had a sip of smoothie...asked for more...and told her mom that if she made them like this, she would drink it. She was also very surprised that it had both kale and spinach in it!

Saturday, July 30, 2011

Green Smoothies

I've been making the family green smoothies for a while now, at least a year. We were instantly sold when we started because...well, they taste just like regular smoothies! I get lots of questions about how I make them, lots of requests for my "recipes." Well, I'll give it a go...but I'll warn you... I don't really follow an actual recipe. And once you get started you'll see why.

And because of this, hopefully this post won't be all over the place and will make some sort of sense!

Why are green smoothies important? For one, who doesn't like a good smoothie?! Secondly, how many of you consume a lot of greens on a daily basis? Greens are so nutritionally dense, but most of us do not eat them daily or even often. They're packed with all sorts of vitamins, minerals, antioxidants, proteins, fiber, phytonutrients...just such an incredible amount of goodness!! And if you don't eat them because you don't like them... Or if you only eat them on occasion in a salad here and there, which isn't as much as you should be getting... Green smoothies are the perfect way to get the goods and enjoy your food!

Friday, July 29, 2011

What's on our plate... Baby Meatballs and Fruit Kebabs

We had this for dinner the other night, and I just thought I would share. I can't link to the recipe. It came from my KIWI magazine, but they don't have it online, so I'm going to post it here. (Side note - I just became a Mom Ambassador via KIWI mag. So excited! Local mamas can look forward to trying out goodies soon, I hope!) We all think it's pretty yummy. Well, all but Aiden. He enjoyed helping to make it, but he doesn't like meat on its own, so...him not liking it doesn't really say anything about how it tastes.

Baby Meatballs
2 small shallots, peeled
2 garlic cloves, peeled
8 fresh small mint leaves (we happen to have two plants on our porch, but you could leave this out, and it would be fine)
1 pound ground chicken (tastes good with ground turkey, too)
2 tsp coriander powder
1 tsp oregano
1 1/2 cups chicken stock

We also added some spinach that needed to be eaten. Great way to add in some extra greens! You can always throw in some spinach, kale, or other greens to things like this. I would have added a bit more than what we did, but I was just using up the little bit we had left, so I only used a small handful - since that's all we had.

You can easily vary the spices and other add-ins to make this yours. I've only made it a couple times so far, so I haven't messed with it much. And it's just so darn easy!
  • In small food processor, blend shallots, garlic, and mint (and greens, if adding!)
  • Mix together the shallot paste, chicken, and spices.
  • Moisten palms with water and roll mixture into about 35 small balls, about half the size of a golf ball. OR you can do what I do...use a *small* ice cream scoop. This is cleaner, faster, and you get the same size each time. The first time I made these, I used the scoop but still used my hands to smooth the balls. This time, I did not. Just scooped and added to the broth. They don't come out perfectly rounded, but...who cares about that? I don't.
  • In a deep, wide pan, bring the stock to a boil. Add meatballs to the broth; cook for 3-4 minutes. Reduce heat to medium and continue to cook for about 8 minutes. Remove and cut open one meatball to check for doneness. When cooked through, remove meatballs with slotted spoon. Serve with marinara sauce or other dip. 

Camden liked this with marinara. Ryan and I use another dip, suggested in the magazine. It's really fancy. Use equal parts ketchup and vegenaise (or mayo). See? Fancy. Camden's not a big ketchup or mayo fan, so he didn't like that. Aiden didn't even try it. What's up with that whole "if they help cook it, they're more likely to try/like it"?? That doesn't really work for him. He helped make this entire meal, yet he wouldn't try the sauces and finally tried one tiny bite of a meatball (and spit it right out - I think it's a texture thing with him and meat). He was all talk while cooking, but it did not spill over into the eating part.

We served this with fruit kebabs and peas. I'm not sure why, but I like serving the baby meatballs with other round foods. Just for fun.

The magazine suggests using honeydew, strawberries, grapes, and mozzarella balls on the kebabs with a dip on the side (or poured over the kebabs). We made ours with cantaloupe, grapes, and mozzarella. Honeydew was over $6 for one at the store - no thanks! The sauce...I'm not sure why I made it. I should have known better. We like fruit AS IS, and none of us cared for the fruit with the sauce. We all tried it and then went back to eating the kebabs plain. I won't bother making it again...

But if you are a sauce person and want to try it, here's the recipe. We just used the oj, honey, soy sauce, and olive oil... But you can make it how you want!

1/3 cup orange juice
2 Tbsp olive oil
2 Tbsp honey
1/2 tsp peeled gingerroot, minced (optional)
1/2 tsp orange zest
1/4 tsp lemon zest
1/2 tsp soy sauce

Combine ingredients in jar. Close lid and shake. (Great job for the little ones!) Chill for an hour to let flavors meld. Serve with fruit kebabs!

First time making this dish...

And our second time... We'll be keeping this in our meal rotation. It's super yummy! And very versatile, too!

As you can see, the meatballs in the first picture are smoother because I took the time to smooth them out with my hands after using my scoop. I did not in the second. They taste just the same, it was faster to make, and my hands didn't have to get all messy! The bottom ones have more color due to the added spinach - could have used more if I hadn't run out! Our fancy dip is shown in the top bowl, leftover marinara from making lasagna in the bottom bowl.

Aiden helped with all parts of making this dinner, of course. That kid will not let you do one single thing in the kitchen without helping! He brings over the chair himself and just insists on helping, no matter what you are doing. He begs to help cook, he begs to help wash the dishes. And trust me, we are not about to tell him no!! Why would we do that? Sure, it takes longer sometimes. And sometimes (well, often) it means the mess is bigger. But no way are we going to deny his wish to help. One day he won't want to do it, and we would rather encourage his help while he likes it! One morning...he even helped me make my coffee. That's how desperate he was to help! And of course, I let him.

He'll be cooking our dinners before we know it, right?

Wednesday, July 20, 2011

Blueberry Season!

I love summer. I think one of the main reasons I love it so much is all of the fresh produce that is suddenly available...all the fruits and veggies you can find at the Farmer's Market and local Pick-Your-Own farms. And yeah, the grocery store, too. I told Ryan the other day, I think the way to my heart is fresh, organic produce. After buying some cherries and wishing I had more, he bought some on the way home and even found (and purchased the next day) a cherry pitter that pits four cherries at once. I was beyond thrilled. Yes, it's definitely the way to this girl's heart...

I'm finally getting him on board with picking our own fruits from some of the local farms, too. Not that he loves doing it, but he's getting better at enjoying it. His biggest complaint is the heat, of course. And then there's the fact that it's "work." And then I have to mess up the kitchen washing the fruit, flash-freezing it in batches, and getting it into containers to freeze, etc, etc. But he's seen the payoff from the last couple years, especially with how cheap it is, so he's much more on board than he was when he first started this tradition I have...


I already wrote a post about what we do with all of our strawberries from the spring. In the summer..it's time for blueberries! We found a couple not-so-nearby places that have pesticide-free blueberries, the closest being about 25 minutes. Blueberries take longer to pick, being so small and on bushes. And with it being smack in the middle of summer, it gets hot, so we go as early as possible! I've discovered it's good to have two parents around when taking a toddler, mostly due to the time issue, the more open fields, and the fact that it's a bit more tedious than strawberry picking. Those berries are much smaller, so it takes longer to get enough! But oh man is it worth it! Fresh blueberries you've picked yourself are just so much better than store-bought (or even those from the Farmer's Market - they're just that much fresher!). Even after freezing and thawing, they're still yummy to just pop in your mouth. And you can't beat the price when you compare picking your own to buying them at the market or the store (esp if you're getting organic - and keep in mind, blueberries is on the Dirty Dozen list, so we get organic).

I freeze most of the berries to use throughout the year. We go through a LOT of frozen blueberries...for muffins, to toss into oatmeal or things like that, in smoothies (we make lots of smoothies!), etc. Aiden loves to eat them frozen when he gets the chance. I also like to make blueberry sauce. It's delicious over ice cream, pancakes and waffles, or in yogurt. And here is the recipe.... Actually, two. One is a sweeter version, and the other uses honey instead of sugar (and much less). Both are good, but I will be honest in that I prefer the first. Yes, it has more sugar, but I easily use less of it because it is sweeter.

Blueberry Sauce
From Barefoot Contessa, Back to Basics
Makes 2 cups.
This recipe is for the whole 2 cups, but I always halve this recipe. And it still makes more than enough - and lasts us quite a while! A little goes a long way.

3/4 cup freshly squeezed orange juice (or as we do, store-bought, because really...)
2/3 cup sugar (you can use a bit less)
1 Tbsp cornstarch
4 half-pints fresh blueberries (why doesn't she just say 2 pints??)
1 tsp grated lemon zest
1 Tbsp freshly squeezed lemon juice (I never ever remember the lemon ingredients...)

Combine the orange juice, sugar, and cornstarch in a medium saucepan and bring to a boil, stirring occasionally. When the mixture is translucent and thickened, stir in the blueberries and simmer for 4-5 minutes, just until a few berries have burst but most are still whole. Stir in the lemon zest and lemon juice and cool.

And the recipe with less sugar...

Blueberry Syrup
From cleaneatingmag.com
Makes 1/2 cup

3/4 cup fresh blueberries
2 Tbsp raw honey
1 Tbsp fresh lemon juice
2 tsp arrowroot powder

In a small saucepan, bring blueberries, honey, lemon juice, and 1 Tbsp water to a boil on high heat. Reduce heat to medium-low and simmer 2-3 minutes. Meanwhile, in a small dish, combine arrowroot powder with 1 Tbsp water to form a slurry. Whisk or stir arrowroot mixture into blueberry mixture until incorporated. Simmer for 1 minute or until just thickened, carefully mashing blueberries with a fork to extract juice. Remove from heat and cool. 

Obviously the second one is a bit healthier for you, with less sugar. And really, both are good. When I use some to flavor Aiden's yogurt, I can use a very small amount (very) of the sauce made with sugar, but I need to use a larger amount to get a good flavor when using the honey-based version - and he doesn't need it to be very sweet, either..I just need more to get the blueberry flavor coming through well. Regardless, both are great! Try one, try both and see which you prefer. Or if you know you want the "clean" one, just make it and you won't know any better! ;)

Here are some pictures to get you motivated...

Homemade ice cream with homemade blueberry sauce. Hard to resist!

He didn't even try to resist. ;) In fact, he didn't think he would like it because he's used to plain ice cream. Once he got over the fact that it was on his ice cream anyway and he tried it, he was sold!

On top of gluten-free pancakes (finally found some that taste amazing - you would never guess they were gluten-free...from King Arthur Flour!)

Takes barely any sauce to give the yogurt a great flavor!

Of course, as mentioned above, we don't just serve blueberries via the sauce around here. That's just a special treat here and there. And honestly, our favorite way to eat them...is by the handful. Plain. There's not much better than ripe fruit on its own.

One more picture... While blueberry picking, Camden was playing with a roly-poly, and Aiden was quite interested!

And for more blueberry fun... Here are pictures from our blueberry picking trips this year.
Blueberry Picking


What is your favorite way to eat blueberries??

Thursday, July 14, 2011

Homemade Strawberry Jam

During strawberry season this spring, it seemed anytime I thought of the words "strawberry jam" together, that song "Strawberry Wine" by Deana Carter started going in my head... That's a blast from the past, huh? Anyway, homemade strawberry jam is sooooo easy. Make it once and you'll wonder why you didn't realize before how easy it was. You'll also be sold on how stinking delicious it is and will swear to never buy store-bought again. Maybe not, but that's pretty much been the case for us! Last year I made a bunch but didn't know how much we would need to get us through the year. We barely made it and had to buy a small jar or two. Ours was much better, though. This year, I tried to do the same (but didn't write down how much I made last year, so I had to guess again...), but then we had a TON of rain during the season, which ended it and left us without quite as much as I wanted. *Sigh* And where is that rain now...?

Anyway, strawberry season is over here, but it is still in season in many other areas, so if you want to make some... Go for it!! Here's how we do it.

First, go get some strawberries! Get a bunch. From a local farm (that doesn't use pesticides) where you pick them yourself. That way will get you the best strawberries. And it's fun. :) If you're around the Triangle, our favorite is Phillips Farm. Here are pictures from our picking trips. We made plenty.

2011 April ~ Strawberry season!

Then run to the store to get some pectin. We tried out a couple brands but didn't get to try out a third one that looked promising. Strawberry season ended abruptly due to too much rain. I'll let you know what we thought of the two we tried.

Pectin #1 SureJell

Smash the berries. Don't puree. You want some chunks.

Add sugar. Does it look like a lot of sugar? Well, that's because it is. (There is a low/no sugar variety, but we haven't tried that one.) Basically, this one uses more sugar than berries... 2 cups crushed fruit + 4 cups sugar.

Boil some water with the pectin. This only means cooking for a minute or so, but there is some cooking involved...  

Mix that in with the fruit/sugar and pour into your jars. Sit overnight to set the jam before freezing. 


Pectin #2 Ball

This one uses twice the berries and less than half the sugar. You can see the difference in the amount of sugar if you compare this picture to the one above... 4 cups of berries + 1 1/2 cups sugar.

No cooking at all. Just combine ingredients and stir!

And there you go!

I did a blind taste-test with Ryan to determine which jam he preferred...the one with more sugar or less. He chose the one with less. He didn't know it was the one with less sugar, but he said he thought the other was sweeter and good..but this one had more of a strawberry taste. It does use more berries, but when you pick them from a farm yourself...that doesn't mean much more cost at all! So, that was fine by us. Of course, we didn't know the season was going to end early, so we ended up with a little less than we wanted. The Ball pectin also makes a jam that is slightly softer than the other, but it's not a huge difference and not one that bothers us.

I did have some Pomona's Pectin to try. This is more natural, has no preservatives, and you can adjust the amount of sugar (or honey, etc) that you use. But we didn't get to try it out in the end. You would think we had enough berries, as much as we DID pick, but...we didn't.

Here are some other details, in case you're interested.
  • Pectin costs...  SureJell: $3.37 for a 2-pack / Ball Pectin: $2.32 for a 2-pack (less sugar AND cheaper!) Unfortunately, I didn't write down how many boxes of pectin we used, but each packet of pectin gives between 3 and 3 1/2 pints of jam. 
  • I also had to use jars for freezing, of course. They will run about $8 or so for a case of 12 wide mouth pint-sized jars or about $6 for a case of 12 8-oz jelly jars. I already had most of these but did buy another case of the pint-sized jars. I ended up freezing 21 pints of jam... You can use other containers, of course, but if you go with glass, make sure it's freezer safe first.
  • Strawberries from a nearby farm $1.50 per pound. We bought 81.56 pounds of berries, totaling $135.99. (We did buy 15lbs from another farm that had a few berries left after our favorite had run out, and they charge a bit more.) 
This gave us 21 pints of jam and 40 cups of frozen berries (2 cups per bag, 20 bags).

I was totally going to try to figure out how much it cost me to make the jam versus buying, but...it was getting too complicated. Trying to figure out the cost of the sugar and berries (when I measured per cup and bought per pound) and...blah, blah. It's probably cheaper to make it, esp since we buy organic strawberry jam; either way, it does taste better, and it's nice to have a big stash in your freezer whenever you run out.

If you're wondering how in the world we use so much jam over the year... Well, no we don't eat that many pb&j sandwiches or that much toast and jam. We use a bit of the jam in plain, homemade yogurt instead of buying flavored (way less sugar that way, too!). Every now and then when I need a decent lunch right now and don't have something made up, Aiden loves peanut or sunflower butter in a bowl with a bit of jam and then eaten with crackers. It's great as an ice cream topping, as well.

We've also made some blueberry jam (not sure if I'm going to be crazy about that one) and mango jam, when there was an awesome deal on champagne mangos at Whole Foods. Love those things! I only made half a batch of each of those, about three half-pints.

These are frosty because I took them out of the freezer for the picture... In order: Champagne Mango, Strawberry, and Blueberry jams

Tuesday, July 12, 2011

Kale Chips

So, you may have heard some of the buzz about kale chips... There seem to be posts just about everywhere, and here's another one!

These things are super easy to make, they don't taste half bad, and they're way more than super healthy for you. Even if you don't think you would like them, it certainly wouldn't hurt to try them. And actually...if you don't care for them the first time, try them again. I did *not* like them the first time we made them, but after someone mentioned them a few months after that, I decided to try it again. And hey - I'm a big fan now!

Kale chips fresh out of the oven. YUM.
If you look around online, you'll find a lot of similar recipes, and the cooking times and temps will vary. You really just have to find what works with your oven and your tastes. Here's what we do...

Kale Chips
adapted from 100 Days of Real Food


1/2 - 1 bunch of kale (organic - kale is one of the dirty dozen!)
1 Tbsp olive oil
pinch of salt
1/2 tsp sugar
(Honestly, I don't really measure. Except the sugar. I try to make sure I don't use much more than 1/2 tsp with a big bunch of kale!)

And yes, there is sugar. It's a very small amount, but it makes them taste so good! You can leave it out and add a bit more salt instead. After they're done, you can add some Parmesan cheese. Or toss in some garlic powder with the salt. Try some other spices you like. You can make it however you like. I love it with the sugar. My dear hubby does not. He doesn't really care for them in general, but he likes the sugar version least and likes them more with the Parmesan.

I got the idea for using a bit of sugar from this roasted broccoli recipe. This stuff is also addicting. There are never any leftovers because I eat them ALL. Love it. The sugar caramelizes a bit as the food cooks in the oven. And just like she says about the broccoli and sugar...if you really feel that this tiny bit of sugar is going to ruin all the goodness you're getting from the veggies, well...yeah, I feel for you. We don't eat a lot of sugar around here, so a bit here and there will not cross out the wonderful benefits from eating things like broccoli or kale! (PS, we don't use bleached white sugar, though. Blech.)

Rinse and dry the kale leaves. Then, remove the leaves from each stalk. It's easy to do quickly. Hold your thumb and finger pinched at the base of the leaves, and then slide up the stalk, taking off the leaves. Pull apart into smaller pieces. Toss in a large bowl, drizzle over olive oil, and sprinkle on the salt and sugar, if using. Toss it all around, and then "massage" each leaf to make sure it is covered with the oil. Place leaves on parchment-lined baking sheet, making sure not to put them so close they are touching each other. Roast on 375 for five minutes, turn over each leaf, and then bake another five minutes.

I've seen some people state to cook for up to 20 minutes. The thing is, it all depends on your oven, etc. There's a fine line between having these babies done and burning them. It really takes a matter of seconds to cross that line. Seriously, the other day I took not quite 15-20 seconds after the timer went off before pulling out the chips - they weren't quite burnt but they were starting to get there! So, watch closely the first couple times and you'll find what works. You do want them to turn brown-ish, just not burnt.

Then sit back and enjoy! They do have a very different texture and will basically fall apart in your mouth. It's kind of odd at first. Not bad, just different. Lots of folks say they're like chips. Sorry, but I disagree. They're nothing like potato chips or veggie chips - texture and crunch is totally different. But I still like them. I can eat an entire bowl in no time at all, and I'm suddenly wondering why I didn't make a triple batch...

Here's a cute video that shows some visuals, if you're interested. (Stay tuned at the end for outtakes!)


Is that girl not adorable?! I love how her mama is teaching her to eat so well! And what a neat way to do it - by eating a rainbow every day. They also have a website Today I Ate A Rainbow! Or visit their facebook page here and "like" their page.

And yes, after you mix them all up and get them on the baking sheet, rinse your hands just enough to get the seasonings off. Or, if you just used salt or sugar to season, rub that into your hands before rinsing off. It's a wonderful sugar scrub! (I make my own sugar scrub, and that's about all it is...sugar and oil.) Then take advantage of the olive oil still on your hands and rub it in. Great moisturizer! ;)

Now, I will be honest... Not everyone in this house loves these things. Camden doesn't like them. Ryan says he doesn't but will eat a few. (I've told him he will learn to like them. I have my ways.) Aiden...well, he says he likes them and he will eat one or two tiny pieces. He doesn't like big pieces - has to do with the texture and how they will crumble in your hands if you squeeze them. He eats more each time I make them, it seems. He never says "blech" or acts like they're awful, so that's a sign that he likes them but is getting used to them, which is enough to make me happy. And honestly, I don't mind having most of them to myself! The other day I offered some to the little toddler I watch. While she ate small pieces, she was singing one of our lunchtime songs: "Yummy, yummy, yummy in my tummy, tummy, tummy." I'd say she liked them.

Warnings...
  • Little ones can make quite a mess if they pinch the "chips." They'll have tiny fragments of kale on their hands and face. (I think this is part of what makes Aiden hesitant. He likes to be clean.)
  • Don't go anywhere after eating these before checking your teeth. Don't assume that before you're on the way to a birthday party, your husband will warn you that there are bits of kale in your teeth. (Thank goodness for mirrors in the car, huh?!)
  • These can become addictive. Very.
Have you made them? Let me know what you think or if you have a different way of making them!

Friday, June 3, 2011

Homemade Hummus

A couple of the guys in the house like hummus. I *wanted* to like hummus, but as much as I tried it, I just couldn't.

Until I made it myself. Now I kinda love it.

Homemade hummus is soooo easy to make. You might have heard that from folks who make it and didn't believe it. Maybe you just have to try it to realize how easy it really is. So, do that. Try it!

I tried a couple different recipes before I found out how we liked it. I realized we need to go much easier on the lemon juice than most recipes. And I think I now know why I don't like store-bought...the tahini is made from sesame seeds. I like sesame seeds just fine, even roasted. But apparently I do *not* like tahini made from sesame seeds, which doesn't really make much sense because the only added ingredient other than sesame seeds is a bit of oil. Go figure. Anyway, I like tahini made with sunflower seeds. It's a subtle difference, but enough of a difference for me! Ok, so let's get to making this stuff...

I don't have pictures of how to make tahini, but it is ridiculously easy, as is all of this. And you make a couple cups at a time and only use a bit of it with hummus. It will last quite a while in your fridge, which is a good thing because you'll want to make more hummus and will need that tahini!

For the tahini, you simple roast either sesame seeds or sunflower seeds for a short amount of time. Put them in a single layer on a baking pan, pop them in the oven, and it doesn't take long at all. You want to get the oils coming out of them, but you don't really want to get them roasted. Here's a recipe we like for tahini made with sunflower seeds. I might have used a little less oil, since another recipe for regular tahini used a lot less. I basically combined the two methods to get it how I wanted. Use whichever seeds you prefer. I get both from the bulk bin at our grocery store, and the price for each is about the same.

Then you move on to the actual hummus.

NOW...you can either buy a can of chickpeas OR you can buy them dried and cook them yourself. I happen to avoid canned goods whenever possible, and I get our chickpeas from the bulk section at our grocery store, which is also much cheaper than canned. I buy a bunch and cook them all at once. Then I freeze them in pint canning jars that are freezer safe. One jar equals a can (with maybe a few extra beans in there; no harm in that!). I have plenty of "canned" chickpeas ready to be used whenever I want, there's no concern of BPA from the can lining, and I know they are nice and fresh. Plus, I think they taste a heck of a lot better! I didn't like chick peas when I tried them from the can. When I pull out a jar of them to thaw for hummus, I have to really make an effort not to eat them all before making the hummus.

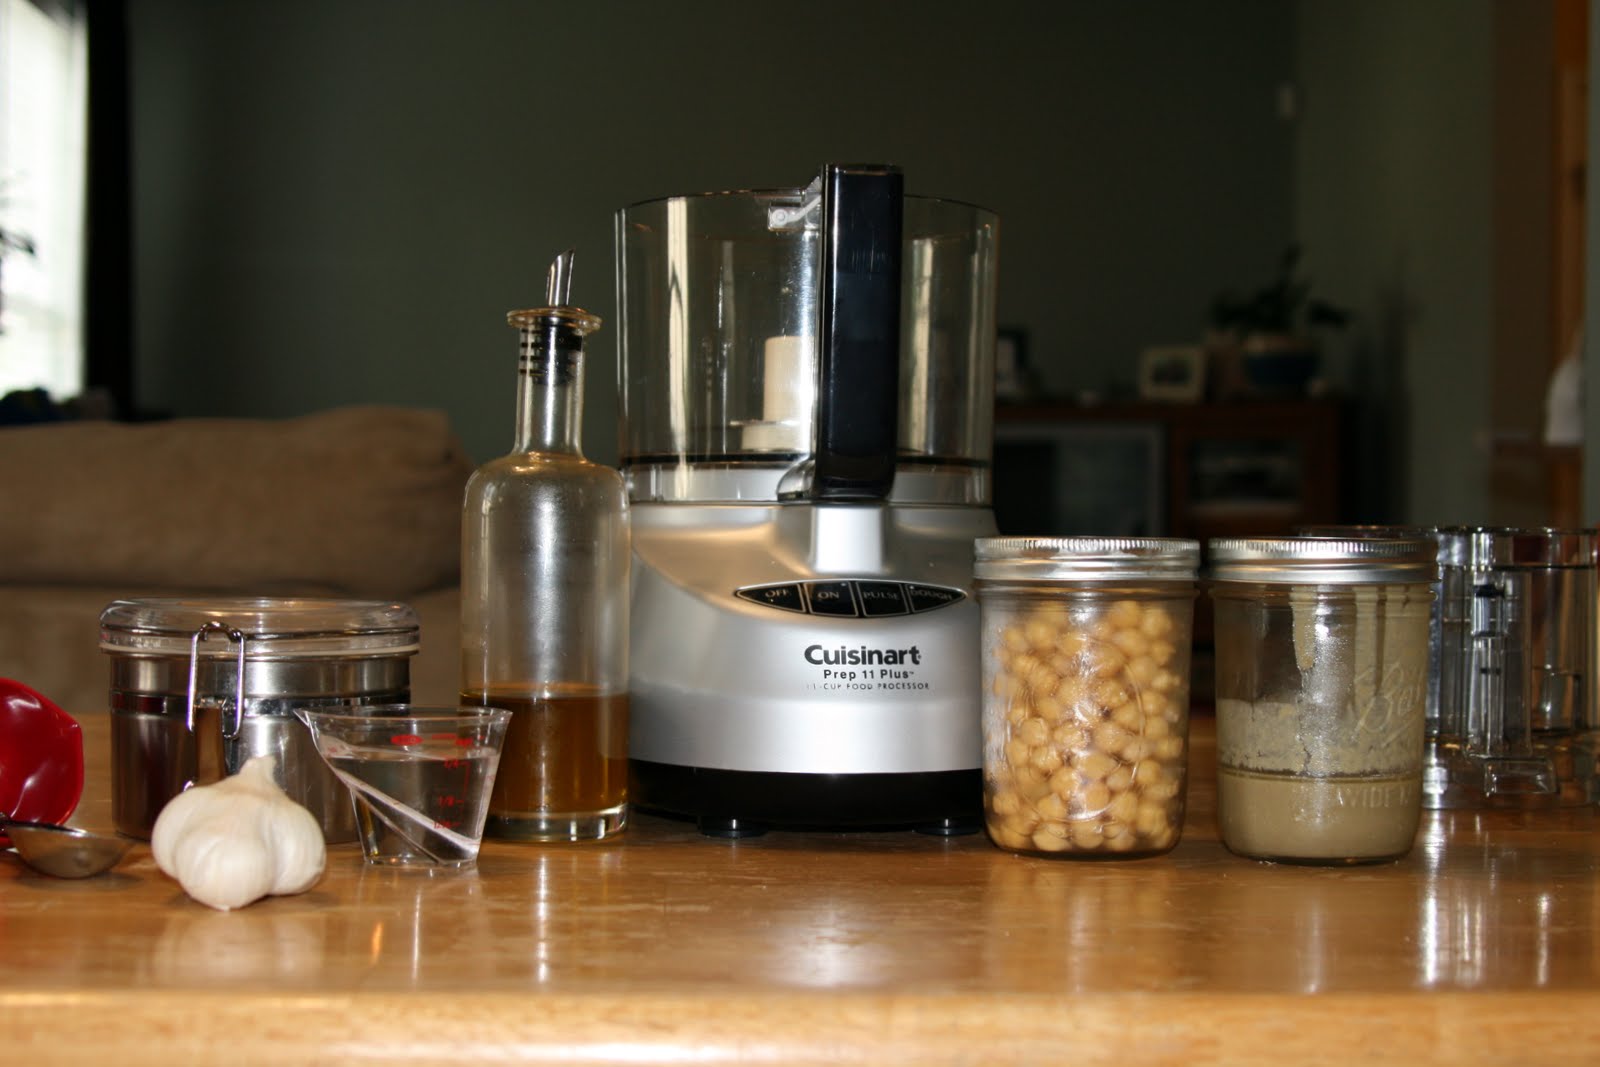
Ingredients (minus lemon juice)
My hummus recipe is based on Alton Brown's recipe found here. I've just made a couple small adjustments to make it suit us better. When his directions say it takes 15 minutes to make this...he's not kidding. Well, it doesn't even take that long, to be honest. More like five minutes or so.

Daisy's Hummus
  • 1 can or jar of chickpeas (which would be between 1 2/3 - 2 cups cooked chickpeas)
  • 2 cloves garlic, minced (or not...you're going to be putting them in the food processor anyway)
  • 1 1/2 teaspoons kosher salt
  • 1 Tablespoon lemon juice (most recipes I see call for a few Tablespoons; Alton's calls for 5! We like 1... We do not like lemony hummus)
  • 1/4 cup water
  • 1/3 cup tahini (stir well before measuring out any)
  • 1/4 cup olive oil


Place chickpeas, garlic, and salt in food processor; process for 15-20 seconds. Stop, scape down sides of bowl, and process another 15-20 seconds. Add lemon juice and water; process about 20 seconds. Add tahini; process another 20 seconds. Scrape down sides of bowl periodically. I usually leave the processor running during all of this and pour ingredients in from the top while it processes, stopping every now and then to scrape down the sides. While processor is running, drizzle in olive oil.
 

Serve! 
So easy, we made it while still in PJs!
We all like to eat this differently. I prefer eating it with veggies, especially carrots. Or veggie chips. Ryan prefers to eat it with pita chips. Aiden..he'll eat it just about any way, sometimes even just with his finger or spoon. Camden doesn't like it. He's now the only one in that category. (Edited to add: Camden is starting to taste it every now and then. He'll eat a tiny bit on a tortilla chip sometimes. He's a consistency kid, and this is one of those consistencies he's not a big fan of..but hopefully he'll like it more and more as he keeps trying it!)


Edited to Add:
I've had some friends ask if this can be made in a blender, for those that don't have a food processor. So, I had to do it myself and find out! You can make it in a blender, but you don't follow the recipe as far as adding certain items at certain times. It will be too thick for the blender and will cause too much frustration. Add it all at once. Blend first with a very low setting to get it started. After you've done that for 30-50 seconds, blend at a higher speed. You want to really get it going! Blend for 45-50 seconds, stir, and repeat a few times until you get the right consistency. It takes a few times, and you need to be patient, but it will work! If you have a BlendTec blender, like I do, blend on speed 1 for one cycle and then speed 5 for a few cycles, stirring between turns. I have been doing it this way since trying it out because the blender is just easier to clean than the food processor...

Homemade hummus! Ready to be devoured!

Monday, May 9, 2011

Meal Plan

These posts are really supposed to be part of the whole "Meal Plan Monday" thing...but I never get them up on Mondays. I am tonight, though!

Here's what's on the menu this week...

Beef and Lentils with green beans and corn. One of my favorite main dishes ever! Growing up, I always ate this with green beans - or that's how I remember it, at least. They're not really my favorite vegetable, but they just seem to fit with beef and lentils now because of that. We had roasted potatoes on the menu, but it was all on the computer Ryan takes to work, so...I forgot, realized something was missing, and threw in some corn at the last minute.

Salmon with strawberry salsa, roasted broccoli...and we'll add in the roasted potatoes here, too.

Salsa Chicken with rice, tortilla chips, fruit. This is such an easy dinner! Thanks to my friend, Leigh Ann, for the recipe. :) Chicken, corn, black beans, and salsa...cook in crock pot; shred chicken as it cooks. Add in block of cream cheese during last hour; serve over rice. Yummy!

Sandwiches one night... We had this plan a while back to take one night a week to eat a cheap, cheap meal. We use the savings to add to what we give to a specific few charities.

Grilled chicken, potatoes, roasted broccoli. This is at the end of the weekend, so even if it seems like we're overdoing it on the potatoes and broccoli, we're not. Most of our meals give us leftovers... And like I said, I'm doing this broccoli often until these kids love the stuff!

Mango, avocado, and black bean salad with lime dressing. This is lunch for me. 

I also made this gluten-free Quinoa Breakfast Cake. Oh yum. Everyone wants it! Seriously, I am ALL about this website lately! Everything I have made has been delicious...and not just as gluten-free food. It's delicious food. Period. Last week I also made the strawberry rhubarb crumble...so good. Next time, I'm making the balsamic vinegar version.

Friday, May 6, 2011

Meal Plan

The week is almost over, but I thought I would post it anyway. It's been harder and harder to find time to get on here to blog, but I do have lots of things to post when I get the chance... Some day...

Instead of putting up our schedule, here's a quick (or not-so-quick) run-down of what we're having this week.

Spaghetti with quinoa noodles & salad. We're really liking the quinoa noodles (they're made with a mixture of organic quinoa and corn flours). They taste just like regular noodles, quinoa is really good for you, and you can't tell they're gluten-free. My only complaint is that (with the spaghetti noodles, at least) there's only enough for one night with a little bit of noodles left over. We make meals to last at least two nights, so... I'm glad the quinoa noodles are good because Aiden still doesn't like things with marinara sauce. I don't get it. This time I was smart enough to give him noodles by themselves and some sauce on the side. He ate the noodles.

Salmon, asparagus, and corn... Well, this meal got scrapped, actually. We were supposed to grill burgers Sunday night, but we ran late at the grocery and grabbed burgers on the way home. Kind of ironic to go to Whole Foods, load up on whole, organic, healthy foods...and then get fast food to eat for dinner. But that's what we did. So, we did the grilling on the night we were supposed to have salmon. We were supposed to also keep the asparagus on the menu, but mama just forgot all about it. So, we'll put it with another meal this week - probably tonight. We got the asparagus at the Farmer's Market on Saturday, and it still looks fabulous! We also are going to a different FM now...the big one in Raleigh might be big and open every day, but there is one in Morrisville that is much smaller BUT seems to mainly have either organic produce or produce grown without pesticides (meat at both places are primiarily grass-fed with no added hormones/antibiotics, but there are actually more folks with meat at this FM). While we found a couple places that had pesticide-free produce at the big FM, most of the vendors seemed to react negatively when we questioned their use of them - not to knock that FM, really. But...we're going where the good stuff (and *more* if it) is.

Tacos, rice, fruit salad (with strawberries, champagne mangos - man, I *love* those things!, and kiwi).

Veggie Lentil loaf, mashed potatoes, and...we'll put the asparagus with this meal instead of the frozen peas we were going to have. I found the recipe for the veggie lentil loaf (like meat loaf...but no meat and gluten-free) in KIWI Magazine. Surprisingly Camden saw it on the menu and even saw the recipe...and didn't make any nasty comments and is curious to see how it tastes. Score! Also, I've been wanting to try out this magazine. I guess you could say it's kind of like a Parenting/Parents mag, but it focuses on more organic, eco-friendly kind of things...you know, right in line with me! My friend, Becky, saw one of those deal-of-the-day sites offering it for a great price (it's not the cheapest magazine...not super expensive, but when you realize it only comes out every two months, it's not too cheap), I jumped on the chance to subscribe. I've only gotten one magazine so far, but I *love* it! Totally my kind of magazine, and I'll definitely want to keep subscribing!

Sesame chicken, rice, roasted broccoli. This was a homemade version of sesame chicken, meant to be healthier b/c it wasn't breaded or fried. More like stir-fry type dish. I got it from my Food Network magazine, a recipe by Ellie Krieger (who is known for making healthier versions of things). And I didn't have chili paste and didn't want to buy it to try out a dish for the first time (I might try to find it for next time, though). But we really liked it! Aiden ate it up, too - and he's not always keen on dishes made primarily of meat (except for burgers). It's definitely a weekend dish for me because the prep work isn't all that fast. I'm also getting addicted to this roasted broccoli dish. I could eat those babies just about everyday! The boys think they're ok...and I'm hoping with keeping it on the menu fairly often, they'll soon love it, too.

Let me know if you want any of the recipes for dishes with no links. A couple were from magazines, and I couldn't find them online but am happy to share!

We're also doing a new thing with veggies. I'm keeping sliced raw veggies, such as carrots, zucchini, bell peppers, celery, etc in the fridge and pulling them out every night at dinner. If the kids aren't loving what we're having, they have those on the table to pick from. I put out hummus and some dressings, too. Both boys have been eating them up like crazy! Even veggies they normally wouldn't really be crazy about...just having them there to eat if they want (we put them out but say nothing about it - it's within everyone's reach, and they grab what they want!). Camden eats a lot of carrots and zucchini. Aiden eats a mix of stuff with hummus. It's pretty great. Plus, they have less reason to complain if they don't like dinner. And since there's no pressure, they eat more than they normally would. I'm definitely going to keep this up! We usually eat these veggies throughout the week, but I noticed very quickly last week that we suddenly were going through these veggies a LOT quicker than we usually do.

Thursday, April 21, 2011

Who says Gluten-Free can't be delicious? Breakfast Bars you simply MUST try!

I was writing this JUST before that tornado hit...just hadn't added pictures and hit publish yet. But here it is now. The yummiest thing I've eaten in quite a while!

I made a new gluten-free dish the other day. It sounded good, the picture on the website looked good, and I hoped it would be good. You just never know... But oh man, it exceeded my expectations by...well, a LOT.

And I even left out the chocolate.

Goodness. That's what this is.

I linked to this recipe in last week's menu plan, but I wanted to devote a whole post to it. If you eat a gluten-free diet, you HAVE to try this. Actually, regardless of eating GF or not, you should have this. I'm not sure how many non-GF folks have things like xanthan gum in their house, though. The ingredients in it are easy to find at a local health food store, like Whole Foods, but xanthan gum isn't the cheapest thing to get, esp for just one dish. Just being realistic... If you have it, though, or don't mind forking over the $8 or $10 for it, then make this. [Edited to add...Just rechecked the price for xanthan gum at Whole Foods. Here it was $11.99. So...if it's something you won't use otherwise, find someone who already has it in their pantry instead of buying it for this recipe. It only takes a teaspoon.]

Please.

I followed directions exactly, being the first time I made this. With a few modifications....so it wasn't exactly followed, I guess. I did use eggs. I did not use chocolate because we wanted Aiden to be able to enjoy this, too. (We aren't giving Aiden chocolate yet. Go on, tell us we're depriving our child. Like he won't have YEARS to eat the stuff. Children's taste buds and food habits are formed mostly in those first few years. So, we're trying to make them the most healthy possible. Trust me, he gets sweets. Just ones we decide are ok. We ARE the parents, after all. And he is not deprived, I assure you.) :) Plus, this is a breakfast dish, and I'm not too keen on regularly giving the kids chocolate for breakfast. Me, on the other hand... We used dried cranberries and chopped walnuts instead, which were great. I don't have vanilla powder; she says you can use whatever vanilla you want in the same amount as called for, so I used vanilla bean paste, which was also gluten-free. It does have a bit more sugar than I would like, but I think using a bit less would be fine. I'll use a little less each time I try it to see how low I can take it.

The baking pan I used, a gift from my wonderful mother-in-law
And I don't have an 11x9 pan, so I used a 13x9. I did have to cook it a bit longer, but I'm not sure if that was pan size or what (I would have expected to cook it a bit less when considering the different pan size, so it must have been some other factor). I was worried the edges would burn when I kept having to cook it longer after so many times checking the middle, but it came out *perfect* and did not last long at all...due to being so ridiculously yummy.

Taken out of the oven at 9pm Thursday night; this is what was left by 2pm Friday...
For the recipe and directions/tips/etc, please visit the original post from Gluten-Free Goddess, found HERE.Check out some of her other recipes while there - she has LOTS, and they all look incredible! I intend on trying out loads of them, especially after this success.

Not only did this exceed my expectations, but I couldn't believe how moist and soft it was. It wasn't dense or grainy or gummy, like some gluten-free goods can be. It didn't have that tell-tale taste of most gluten-free flours. Really, you cannot tell this is gluten-free at all! I will be making it again very soon. I would have made it again this week if it hadn't been for no power. It's back on by now, of course (every time I open the fridge, Aiden exclaims, "Look! We have POWER!"), and I will be enjoying this again before the next week is over. This or maybe the banana bread recipe from the same website... I hope you try it, too!